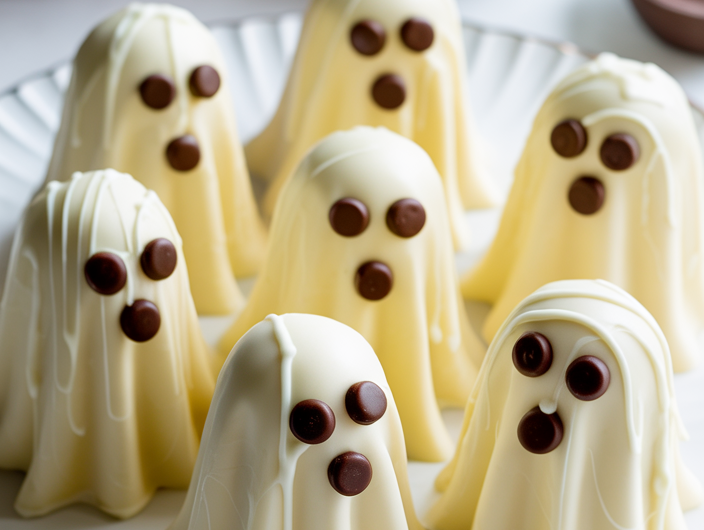
I first made these Ghost Oreo Truffles last Halloween when I desperately needed a last-minute party treat that looked cute without requiring any real decorating skills. I had Oreos, cream cheese, and white chocolate and after a few attempts at piping faces (which ended up looking hilariously silly), I settled on the easiest “ghost” design ever. They looked like tiny draped ghosts, kind of goofy, kind of adorable and everyone at the party went wild for them. These little spooky bites have been a Halloween staple ever since!
⭐ Why You’ll Love This Recipe
- Only 3 main ingredients Oreos, cream cheese, and chocolate.
- No baking required, perfect for kids or quick party prep.
- Cute Halloween treat without needing decorating experience.
- Creamy, rich, and chocolatey classic Oreo truffle flavor!
- Perfect for parties, treat bags, or spooky dessert tables.
📋 Recipe Overview
- Servings: 20–24 truffles
- Prep Time: 20 minutes
- Chill Time: 30 minutes
- Total Time: ~50 minutes
- Estimated Calories: ~110 each (varies by chocolate used)
🧁 Ingredients
- 1 (14–15 oz) package Oreo cookies (regular, not double-stuf)
- 8 oz cream cheese, softened
- 12 oz white melting chocolate or white candy melts
- Black gel icing or edible marker (for ghost faces)
🥣 How to Make Ghost Oreo Truffles
1. Crush the Oreos
- Add Oreos to a food processor and blend into fine crumbs.
- No processor? Put Oreos in a zip-top bag and crush with a rolling pin.
2. Make the Truffle Mixture
- Mix Oreo crumbs with softened cream cheese until it forms a thick dough.
- Scoop and roll into smooth balls (about 1 tbsp each).
3. Chill
- Place rolled truffles on a parchment-lined tray.
- Chill for 20–30 minutes so they’re firm and easy to dip.
4. Coat in White Chocolate
- Melt white chocolate in the microwave in 20–30 second bursts.
- Dip each chilled truffle using a fork, tapping off excess.
- Place back on the tray.
5. Decorate the Ghost Faces
- Once the coating sets slightly, use gel icing or an edible marker to add:
- Two small black dots for eyes
- One slightly larger dot for the mouth
- (Cute, simple, and perfectly ghost-y!)
6. Let Set & Serve
- Chill another 10 minutes until fully hardened.
- Enjoy your adorable spooky treats!
💡 Tips & Tricks
- Use candy melts if your white chocolate wants to seize or clump.
- Chill the truffles really well to avoid crumbs in the melted coating.
- To avoid cracks, let the truffles sit at room temp 5 minutes before dipping.
- Use a toothpick to gently patch any bald spots with extra melted chocolate.
- For cleaner faces, use an edible marker once the truffles are fully dry.
🔄 Variations & Substitutions
Variations
- Mummy Truffles:
Drizzle white chocolate back and forth to create “bandages.” - Pumpkin Patch Truffles:
Use orange melts and add a green sprinkle stem. - Dark Chocolate Ghosts:
Use dark chocolate inside, white on the outside for a fun color contrast. - Glow-in-the-dark ghosts:
Use neon green candy melts for a “slime ghost” twist.
Substitutions
- Cream cheese → Vegan cream cheese for a dairy-free option.
- White chocolate → White almond bark for easier melting.
- Oreos → Any chocolate sandwich cookie works.
- Decorating gel → Mini chocolate chips for eyes/mouth.
Ghost Oreo Truffles
Course: Dessert, SidesDifficulty: EasyServings
20
trufflesPrep time
20
minutesCalories
110
kcalChill time
30
Ingredients
1 (14–15 oz) package Oreo cookies (regular, not double-stuf)
8 oz cream cheese, softened
12 oz white melting chocolate or white candy melts
Black gel icing or edible marker (for ghost faces)
Directions
- Add Oreos to a food processor and blend into fine crumbs.
- No processor? Put Oreos in a zip-top bag and crush with a rolling pin.
- Mix Oreo crumbs with softened cream cheese until it forms a thick dough.
- Scoop and roll into smooth balls (about 1 tbsp each).
- Place rolled truffles on a parchment-lined tray.
- Chill for 20–30 minutes so they’re firm and easy to dip.
- Melt white chocolate in the microwave in 20–30 second bursts.
- Dip each chilled truffle using a fork, tapping off excess.
- Place back on the tray.
- Once the coating sets slightly, use gel icing or an edible marker to add Two small black dots for eyes and One slightly larger dot for the mouth
- Chill another 10 minutes until fully hardened.
- Enjoy your adorable spooky treats!